

Hygrometer
Measurement of air humidity is based on HIH4021 sensor and DS2438 system. I
used for this purpose module presented at the Hobby-Boards i.e.
1-wire humidity.
This module is nice because it does not require calibration. You need to take
into consideration where you install the sensor - it should be placed
in shade. For this reason I would not recommend buying the module
integrated with the solar radiation sensor
(which because of obvious
reasons must be exposed to sunlight). However, if we ignoring that,
decided to buy hygrometer integrated with solar radiation sensor,
then it would be a good idea to solder the CLD240 diode out from printed
circuit board and connect it using cable. In this way the whole system
can be placed in shade, and only the sensor measuring the solar radiation
is exposed to the sun.
 Originally I placed humidity sensor in hermetically sealed electrical box
(with hole at the bottom) on the north wall of the chimney (at the roof).
However two problems occurred:
Originally I placed humidity sensor in hermetically sealed electrical box
(with hole at the bottom) on the north wall of the chimney (at the roof).
However two problems occurred:
- temperature in that place is 2-3 °C higher,
- for about 1 hour the sun shines at that place making the
measurements incorrect.
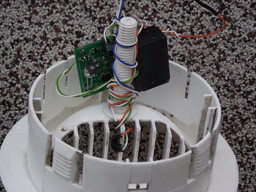
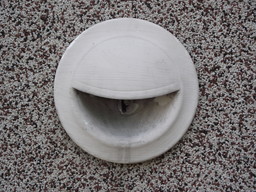
So I moved the sensor to the same place where I measure the outdoor
temperature. It is the air intake (so called zetka) to the house,
located on the north wall. Module measuring humidity can be seen
in the photo on the left and on the right it is the same module after
installing it on the wall (temperature sensor
is that small black dot in the middle). I used special paint that is used
to protect printed circuits from corrosion to cover, protect the whole
module (with the exception of the sensor)
Moisture reading is done using command:
owread 26.sensor_number/HIH4000/humidity
It is the relative humidity. The readings from my hygrometer are
presented in the chart below.
If in our system LEDs measuring solar radiation is not installed then
it is good idea to disable the sampling of input for measuring current:
owwrite 26.sensor_number/IAD 0
Whatever version you have it can be turned off (I do not know whether
it helps):
# turn off "current accumulator"
owwrite 26.sensor_number/CA 0

# turns off eeprom for "current accumulator"
owwrite 26.sensor_number/EE 0
Besides the moisture reading, it is good idea to do the temperature
reading using this system:
owread 26.sensor_number/temperature
Dew point
With those two figures we can calculate the dew point.
Theoretical basis:
ITS-90 model
Berry formula
Magnusa formula
The Berry formula can be used for this purpose:
EW = 10^ ( 0.66077+7.5*T/ (237.3+T) ); // this is the saturation vapor pressure over water.
EW_RH = EW * RH / 100; // multiply with relative humidity
Dp = ((0.66077-log10(EW_RH))*237.3) / (log10(EW_RH)-8.16077); // this is the dewpoint
after simplification:
LogEW = ( 0.66077+7.5*T/ (237.3+T)+(log10(RH)-2)
Dp = ((0.66077-logEW)*237.3) / (logEW-8.16077); // this is the dewpoint
I used the Magnus formula (the newer one) for this purpose:
H = (log10(RH)-2)/0.4343 + (17.62*T)/(243.12+T);
Dp = 243.12*H/(17.62-H); // this is the dew point in °C
It has to be modified a bit because there is no log10 function in bc:
DewP=`echo "scale=20 ;l10=l($H)/l(10); h=(((l10 - 2) / 0.4343) + \
	((17.62 * $T) / (243.12 + $T))); \
	(243.12 * h) / (17.62 - h)" | bc -l`
Where H contains the relative humidity readings and T the temperature
reading in °C. The result (in the DewP variable) is also in °C.
We can as usual add to that our favourite chart:
Personal Weather Station.
 Home automation www.tomkii.net/tech/pomiary/
- what I measure, which devices
I use, and how do I use them.
Home automation www.tomkii.net/tech/pomiary/
- what I measure, which devices
I use, and how do I use them.
Forum forum.tomkii.net/forum-5.html
Contact e-mail:
Napisz@Tomkii.net
Last Modified: 2011-08-23